Setting up MCP Server
MCP Server settings may vary between tools, please check documentation of the tool you want to use.
VSCode and MCP Server
Please have a look how to use MCP Server with VSCode in this documentation. More MCP Server for VSCode can be found in the Marketplace
Adding MCP Server
Using the Add MCP Server command
| Step | Details | Additional Information |
|---|---|---|
| Click on the View Menu and select Command Palette | 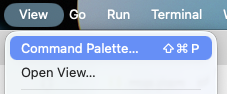 | |
| In the Command View search for Add MCP Server and click on it |  | |
| From the listbox select HTTP | 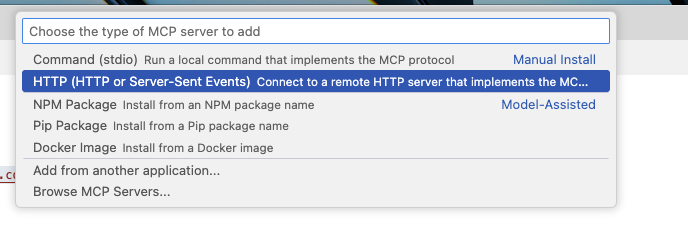 | |
| Enter the MCP Server URL (example for Control MCP server) |  | |
| Enter the Name for this MCP Server section | 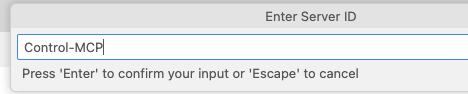 | |
| Decide where to store this configuration, for the demo use local Workspace | 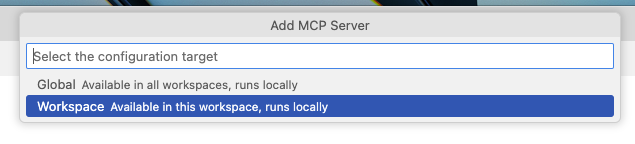 | |
| Added MCP Servers will be shown in the Extension View under MCP Server |  | |
| You can open the mcp.json to add more manualy (for example the Authorization key for Control MCP) |  |
Manualy editing the mcp.json file
To be able to manualy edit the mcp.json file you have to first let it be created by VSCode, easiest way is to use Add MCP Server command to add an entry then open it from the MCP server settings for editing.
Preparing the mcp.json file
NOTE: Templates for
mcp.jsonfiles with preprovided sections: for local mcp server and for remote mcp server
Add the MCP Servers into the mcp.json file in the "servers" section.
Loop MCP Server
The Loop MCP server uses single sign on for authentication so the setup is very simple. Please have a look at the documentation for Loop MCP server usage. There is no local MCP Server available.
Configure the MCP Server Section
Control MCP Server
Configure Control MCP Server to use SSO
Configure the MCP Server with Access Token
Get the necessary Access Token
| Step | Details | Additional Information |
|---|---|---|
| For external access to the repositories you need to provide an Access Token | ||
| to create a new token, click on your User Profile and select Settings | ![User Profile][ControlUserProfile] | |
| In the Settings view click on Access Tokens then enter a Token name to identify its purpose | ![Name for new PAT][ControlNewPATName] | |
| Click on Select Permissions to set the access rights, select All to cover all repositories | ![Open Select Permissions][ControlOpenPermissions] | |
| You can set any permission setting as you need it. Please be aware to limit the access though to prevent security issues | ||
| Example: Set Repository to Read and Write and Set User to Read | ![Set Permissions][ControlPATSetPermissions] | |
| These settigs are the minimal needed to provide access to work with your repository through external tools | ![Create AccessToken][ControlCreateAccesstoken] | |
| Press Generate Token | ![Generate Token][ControlGeneratePATButton] | |
| Do not to forget to Copy and Paste the token! | ![AccessToken][ControlAccessToken] |
Use Access Token in MCP server settings
Use your token and replace the <control token> part with your token in the Control MCP Server section.
"Control-MCP-Server": {
"url": "https://<hostname>/control/mcp",
"type": "http",
"headers": {
"Authorization": "token <control token>"
}
}
Test MCP Server
Please have a look at the Testhub Documentation how to configure the MCP server for more details.
Get the necessary Offline User Token
| Step | Details | Additional Information |
|---|---|---|
| click on the Profile Link on the top right of your screen to get a menue | ![Test top right menuebar][TestToprightMenue] | |
| Click on Create Token in the menue for a new PAT | ![Create Token][TestProfileMenue] | |
| A new PAT will be created automatically and shown. COPY and PASTE into a secure storage for furter usage | ![Test New PAT is shown][TestNewPAT] | |
| click on Close to close the dialog | ![Close button][ButtonClose] |
Configure the MCP Server Section
Use your token and replace the <test token> part with your token in the Test MCP Server section.
"Test-MCP-Server": {
"url": "https://<hostname>/test/mcp/stream",
"type": "http",
"headers": {
"Authorization": "Offline <test token>"
}
}
Deploy MCP Server
Deploy MCP Server requires a slightly different approach. Please have a look at the documentation for Deploy MCP server usage for more details.
Get the necessary Token
| Step | Details | Additional Information |
|---|---|---|
| click on Tokens ![Tokens][DeployPATLink] in the Security settings to view and create new PAT | ![System Settings View][DeploySystemSettings] | |
| A list of existing Tokens (PAT) is shown | ![List of PAT][DeployPATList] | |
| Click on Create Token ![Create Token button][DeployCreatePATButton] and fill in the details in the new dialog | ![PAT Creation Dialog][DeployCreatePATDialog] | |
| Provide a description, user, expiration and optional restrictions from where this PAT can be ued | ||
| Click on Save ![Save][ButtonSave] and the new PAT will be shown | ![New PAT is shown][DeployNewPATInfo] | |
| Do not to forget to COPY and PASTE the PAT into a secure storage for furter usage, then click Close ![close][ButtonClose] | ||
| An updated PAT list is shown | ![Updated PAT list][DeployPATListUpdated] |
Encrypt Token
You need to use base64 to encode the token with the Authentication Type string.
- Encrypt on MacOS or Linux
- Encrypt on Windows
$encoded = [Convert]::ToBase64String([System.Text.Encoding]::UTF8.GetBytes("PasswordIsAuthToken: <Your Deploy Token>"))
write-output $encoded
Configure the MCP Server Section
Use the output and replace the <base64 encoded deploy token> part with it in the Deploy MCP Server section.
"Deploy-MCP-Server": {
"url": "https://<hostname>/deploy/mcp",
"type": "http",
"headers": {
"Authorization": "Basic <base64 encoded deploy token>"
}
}
Measure/Release (Velocity) MCP Server
Measure and Release use the services of DevOps Velocity. Please have a look at the DevOps Velocity documentation MCP section for more details.
Get the necessary User Access Key
| Step | Details | Additional Information |
|---|---|---|
| click on the Settings ![Settings][ButtonSettings] Link on the top right of your screen to get a menu | ![Measure top right menubar][MeasureToprightMenue] | |
| click on My Profile ![My Profile][MeasureMyProfileLink] to view the Profile settings | ![My Settings Menu][MeasureSettingsMenue] | |
| A list of User Access Keys (or PAT) is shown | ![Measure List of UAK or PAT][MeasurePATList] | |
| Click on the Create User Access Key ![Create UAK Button][MeasureNewPATButton] and a new Dialog appears | ![UAK Dialog][MeasureNewPATDialog] | |
| Provide a name for the UAK/PAT and click Create Button to get the token | ![Measure New UAK][MeasureNewPATMessage] | |
| COPY and PASTE the key into a secure storage for further usage, then close the dialog | ||
| The newly created UAK/PAT is shown | ![new UAK is shown][MeasurePATListUpdated] |
Configure the MCP Server Section
Use your User Access Key and replace the <velocity token> part with your token in the Velocity MCP Server section.
"Velocity-MCP-Server": {
"url": "https://<hostname>/velocity/mcp",
"type": "http",
"headers": {
"Authorization": "UserAccessKey <velocity token>"
}
Plan MCP Server
In the actual Version of Loop the remote MCP Server for Plan is not available, it is planned to be delivered in the next release. We need to use the local MCP Server which requires the Personal Access token and a Teamspace ID (which is named Database ID in Plan)
Get the necessary Personal Access Token
| Step | Details | Additional Information |
|---|---|---|
| Click on your Profile Icon in the Sidebar and select Personal Access Token | ![Sidebar Profile][PlanSidebarProfile] | |
| A list of existing Personal Access Tokens (PAT) is shown | ![List of PATS][PlanListPATS] | |
| Click on Create New API Token | ![Create PAT Button][PlanCreatePATButton] | |
| a dialog is shown, please provide a name and a validity time | ![PAT creation dialog][PlanPATDialog] | |
| PAT is created, press the Copy button ![Copy Button][ButtonCopy] to copy into Clipboard | ![PAT is created][PlanPATCreated] | |
| PAT is copied, paste it into a secure storage for furter use | ![PAT Copied][PlanPATCopied] | |
| Close the dialog and updated list is shown | ![Updated PAT list][PlanListnewPATS] |
Get the necessagery Teamspace (DB) ID
| Step | Details | Additional Information |
|---|---|---|
| Please use the "Home" button on the left sidebar to switch to the Home page for Plan | ![Plan Home Page Button][PlanHomePageButton] | |
| On the right side click on My Applications | ![My Applications Button][PlanMyApplicationButton] | |
| Click on Tenant Management ![Tenant Management Button][PlanTMButton] to open a the Tenant View | ![Tenant Management View][PlanTMView] | |
| In this view select your Tenant (in this example Demo) | ||
| select the Details view tab and switch it on | ![Tenant Detail View][PlanTMDetailSwitch] | |
| more information is shown about the tenant | ![Tenant Details][PlanTMDetails] | |
| The Database ID is shown, and copy it for further usage | ![Plan Database ID][PlanDBID] |
Configure the MCP Server Section
Use your Personal Access token and replace the <plan token> part with your token in the Plan MCP Server section, replace the <teamspace id>with the value of the DB ID.
"plan-mcp-server": {
"command": "npx",
"args": [
"-y",
"@securedevops/mcp-devops-plan"
],
"env": {
"PLAN_ACCESS_TOKEN": "<plan token>",
"PLAN_SERVER_URL": "https://<hostname>/plan",
"PLAN_TEAMSPACE_ID": "<teamspace id>"
},
"type": "stdio"
}
VSCode mcp.json template
Here the mcp.json template file using available remote MCP server and the local one for DevOps Plan (will be changed as soon as the remote one is available)
{
"servers": {
"Loop-MCP-Server": {
  "url": "https://<hostname>/loop/mcp",
  "type": "http"
},
"Control-MCP-Server": {
"url": "https://<hostname>/control-mcp",
"type": "http",
"headers": {
"Authorization": "token <control token>"
}
},
"Test-MCP-Server": {
    "url": "https://<hostname>/test/mcp/stream",
    "type": "http",
    "headers": {
    "Authorization": "Offline <test token>"
    }
},
"Deploy-MCP-Server": {
    "url": "https://<hostname>/deploy/mcp",
    "type": "http",
    "headers": {
    "Authorization": "Basic <base64 encoded deploy token>"
    }
},
"Velocity-MCP-Server": {
  "url": "https://<hostname>/velocity/mcp",
  "type": "http",
  "headers": {
    "Authorization": "UserAccessKey <velocity token>"
  }
},
"plan-mcp-server": {
  "command": "npx",
  "args": [
    "-y",
    "@securedevops/mcp-devops-plan"
  ],
  "env": {
    "PLAN_ACCESS_TOKEN": "<plan token>",
    "PLAN_SERVER_URL": "https://<hostname>/plan",
    "PLAN_TEAMSPACE_ID": "<teamspace id>"
  },
  "type": "stdio"
},
"wait_server": {
"command": "npx",
"args": [
"mcp-wait-server@latest"
],
"env": {
"MCP_WAIT_MAX_DURATION_SECONDS": "210",
"MCP_WAIT_TOOL_DESCRIPTION": "Waits for a specified number of seconds. Use this to create a delay after starting a long-running operation (like a script or download via another tool), allowing it time to complete before you proceed or check its status."
}
}
},
"inputs": []
}